

Built For
Instruments: Forex
Trading Style: Swing Trading
Playbook Overview
This strategy is built around two core parts:
The Market Maker Model (MMM) – a framework that helps you understand where the price is likely to reverse.
Optimal Trade Entry (OTE) – a tool for finding high-probability entries once the setup forms.
The idea is simple: institutions (market makers) move the price through a pattern of accumulation, manipulation, and distribution. When you understand this structure and combine it with a precise entry method, you can take high-quality trades with defined risk and strong reward.
This playbook teaches you when to trade, where to trade from, and how to manage the trade.
The Market Maker Model (Framework)
The Market Maker Model is not a strategy by itself; it’s a framework that tells you where the price is likely to reverse or expand from. It works in three stages:
- Accumulation: A tight range where price moves slowly. Often happens during the Asian session.
- Manipulation: Price breaks out of that range to trap traders. This usually happens in the London session.
- Distribution: Price reverses sharply in the opposite direction. This is the move we want to catch, usually during the New York session.
You should only trade after the manipulation is done and the price starts distributing in your direction.
Playbook Rules
When and Where to Look for the Setup
Time of Day
The setup only works well if the price opens close to a key level. If the price opens far from a key level, you skip the trade.
Here are the sessions you want to focus on:
- London Open: 2 AM to 5 AM New York time.
- New York Open: 7 AM to 10 AM New York time.
- London Close: 10 AM to 12 PM New York time (works best when a big move has already started earlier).
Key Levels (PD Arrays)
The setup must occur near one of the following high-timeframe levels:
- Previous Day’s High or Low.
- Previous Week’s High or Low.
- Daily or 4-Hour Fair Value Gaps (FVG).
- Daily or 4-Hour Order Blocks.
- Daily or 4-Hour Breaker Blocks.
- Mitigation Blocks.
Daily Bias (Direction)
You must know the direction you want to trade before the day begins. This is called having a bias.
If the weekly and daily charts are bearish, you are only looking for short setups. You never trade both ways. Your bias tells you which side is accumulation and which side is distribution.
Confirmation – Smart Money Reversal (SMR)
Once the price reaches your key level, you wait for confirmation. This confirmation is called a Smart Money Reversal, and it must include:
Breaker Block Structure:
A shift in structure where price forms a high, a low, a higher high, and then a lower low.
Some traders call this a head and shoulders pattern.
Displacement:
A strong candle that closes with body (not just wick) past the key level. This shows real momentum entering the market.
Use the 15-minute or 30-minute chart for this confirmation. Only drop to the 5-minute if you’re refining the entry after confirmation is already done. Never use the 1-minute chart for this model.
If the displacement is weak or there’s another PD level in the way, skip that entry and wait for the second pullback.
Execution Timeframes
- Daily / 4H: Establish HTF bias and find PD arrays.
- 15-Minute or 30-minute: Confirm breaker block and displacement.
- 5-Minute: Only used to refine entry after 15m confirmation (e.g., find 5m FVG)
Avoid 1-minute charts unless highly experienced. The model relies on timeframe alignment and structure.
Entry – Optimal Trade Entry (OTE)
After confirmation, draw a Fibonacci retracement from the high to low of the move. You will only enter if the price pulls back into one of the following levels:
- 0.50 (50%)
- 0.62 (62%)
- 0.705 (70.5%)
- 0.79 (79%) (optional)
If price doesn’t pull back to at least the 50% level, skip the entry.
Why only above 50%? Because entering too early won’t give you enough room for reward compared to your risk. This entry zone gives you a proper R-multiple.
Stop Loss Rules
- The default stop loss goes at the 1.0 level, which is the high of the fib leg.
- You can use a tighter stop loss at the 0.90 level (90%) if you want less risk.
- Choose the stop that matches your style: tight for better risk-to-reward, or wide for more room.
Take Profit (TP) Rules
Your first TP is always at the 0.0 level on the Fibonacci leg. This creates fixed R-multiples based on your entry:
- 62% entry = ~2.38R
- 70.5% entry = ~3.75R
- 50% entry = ~1.63R
These numbers do not change; they are based on the percentage of the range, not the size of the move.
Trade Management
Break-Even and Risk Removal
- Once the price closes past the 0.20 level, move your stop loss to breakeven.
- If the price closes with momentum through your TP level, you can let it run and trail your stop loss behind. Make the old TP your new stop loss.
Scaling In
- If your first entry is at breakeven or better, you can add another entry using a new risk.
- Never scale in if your first position is still exposed to full risk.
Pros and Cons of the Strategy
This model is designed to deliver high-quality, repeatable setups — but like any trading method, there are key things to understand before using it.
Note: The cons listed here aren’t disadvantages. They are things to be aware of — important characteristics that require patience, discipline, and proper management to make the model work effectively.
Pros
Fixed Risk-to-Reward (R) Levels: If you enter at the 62, 70.5, or 79% fib levels with a stop at the 1 and TP at the 0, your R-multiple is always fixed. It doesn’t matter how big or small the range is. Because it’s a percentage of the range, it’s consistent every single time.
You Don’t Have to Guess Your TP: Since your TP is fixed based on the fib, you’re not randomly deciding on 2R or 3R. It’s all structured. You already know what the take profit is when you enter.
Better Trade Management With Break-Even Plans: When the price reaches the 0.20 fib level, that’s the point where you move your stop to break-even. Now the trade is safe, you can’t lose money. If the price continues in your direction, you can even use the original TP as your new stop loss.
It Helps With Consistency: Because the R is fixed and the process is rule-based, you start to build consistency across your trades.
Cons (Things to Be Aware Of and Manage)
Patience Required: You won’t get this setup every day. You need to wait for the market to reach a PD array, confirm with a breaker block and displacement, and then pull back into your fib zone. It’s not a daily trade.
First Leg Often Doesn’t Reach OTE: After the first breaker block and displacement, price often won’t pull back deep enough into the 62–79% zone. That means you might miss the first trade if you’re waiting for a perfect OTE. That’s normal.
Confirmation Still Needs Skill: You can’t blindly mark fibs. You need to know how to grade swings, where to place the fib, and how to identify a clean breaker block with proper displacement. That takes practice.
Scalping Is More Erratic: Using this on lower timeframes like the 1-minute brings way more noise. You’ll get chopped up, break-evened, and faked out more often.
Discretion and Intuition Still Matter: This model isn’t fully mechanical. Things like shaving the stop loss, deciding whether to re-enter, or trailing your stop, come down to feel and judgment.
Trade Breakdown
Context & Bias
The higher timeframe (Daily) was bearish. Bias was set before the session opened. The price opened near a key PD array in this case, the previous day's high.
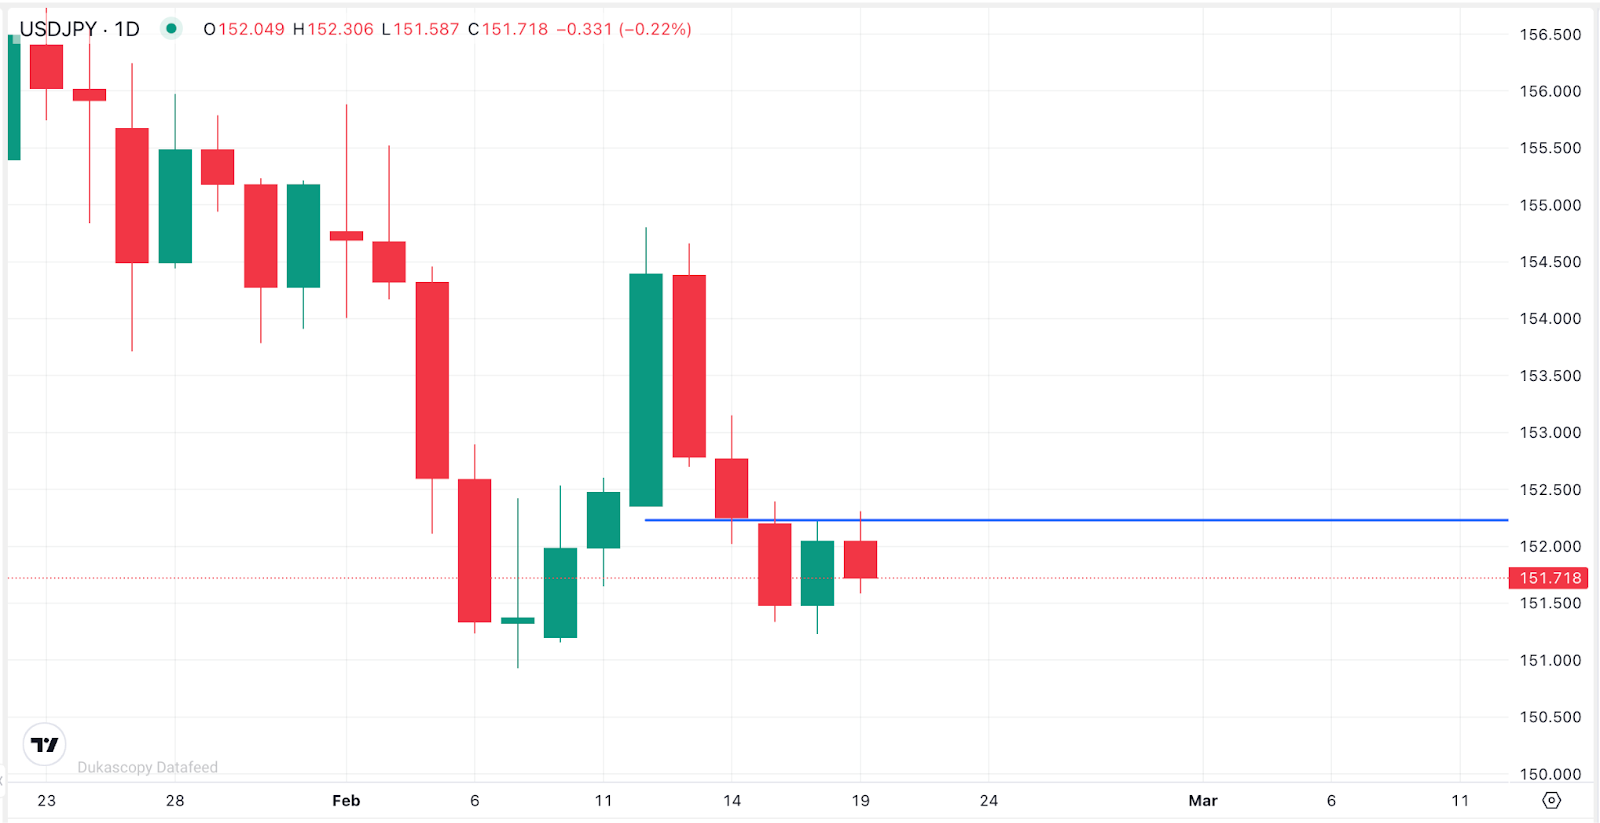
Accumulation Phase
During the Asian session, the price moved in a tight range. This created the “accumulation” leg of the Market Maker Model.
Manipulation Phase
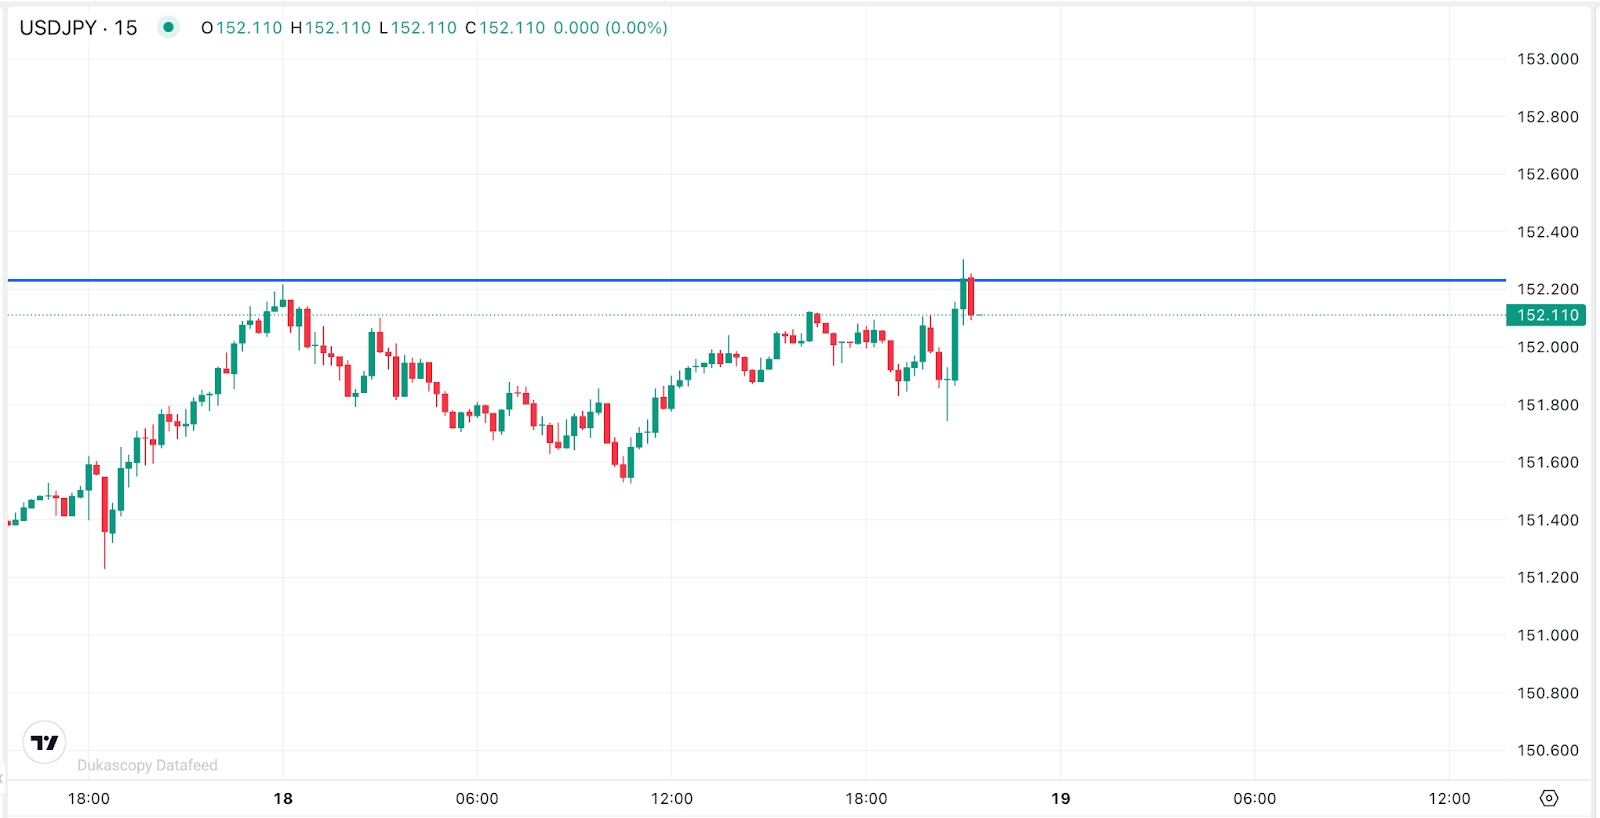
At the London open, the price ran above the previous day’s high; this was the liquidity sweep. This manipulation move created the high of the day.
Confirmation (Smart Money Reversal)
- After the sweep, price formed a breaker block pattern (high, low, higher high, then lower low).
- A strong displacement candle closed below the breaker with momentum. This confirmed that distribution had begun.
Fibonacci Setup
- Draw a fib from the swing high (created during the manipulation) to the swing low (created after displacement).
- Entry in the 0.62–0.705 retracement zone.
Execution
- Price retraces into the OTE zone and triggers the entry.
- Stop loss is placed at the 1.0 fib level (swing high).
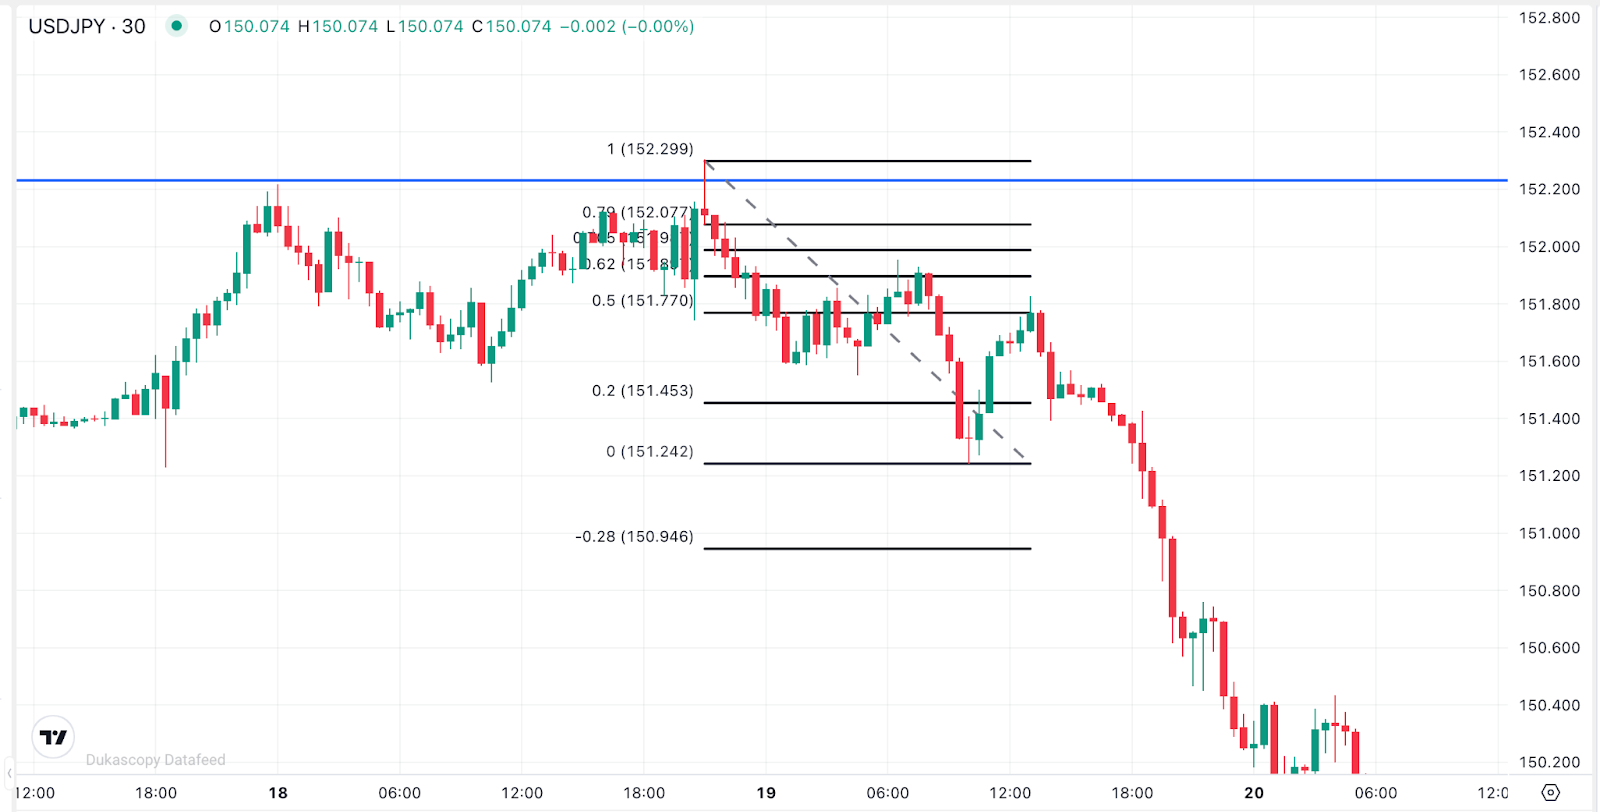
Risk Management
Once the price closes below the 0.20 fib level, stop loss shifts to breakeven to eliminate downside risk.
Take Profit
First take profit set at the 0.0 fib level.
Note: If the price breaks through that level with strong momentum, the original TP becomes a trailing stop.


.svg)

.svg)
